Some stores prefer a single-page checkout, others a multi-step. The reality is that there is no one-size fits all. You should use what is best for your store.
With Ollie Shop you can configure your store to fit your needs. For example if you want to upsell your customer with a Warranty, instead of polluting the Cart page with more information you can create a dedicated step for the user to make the decision.
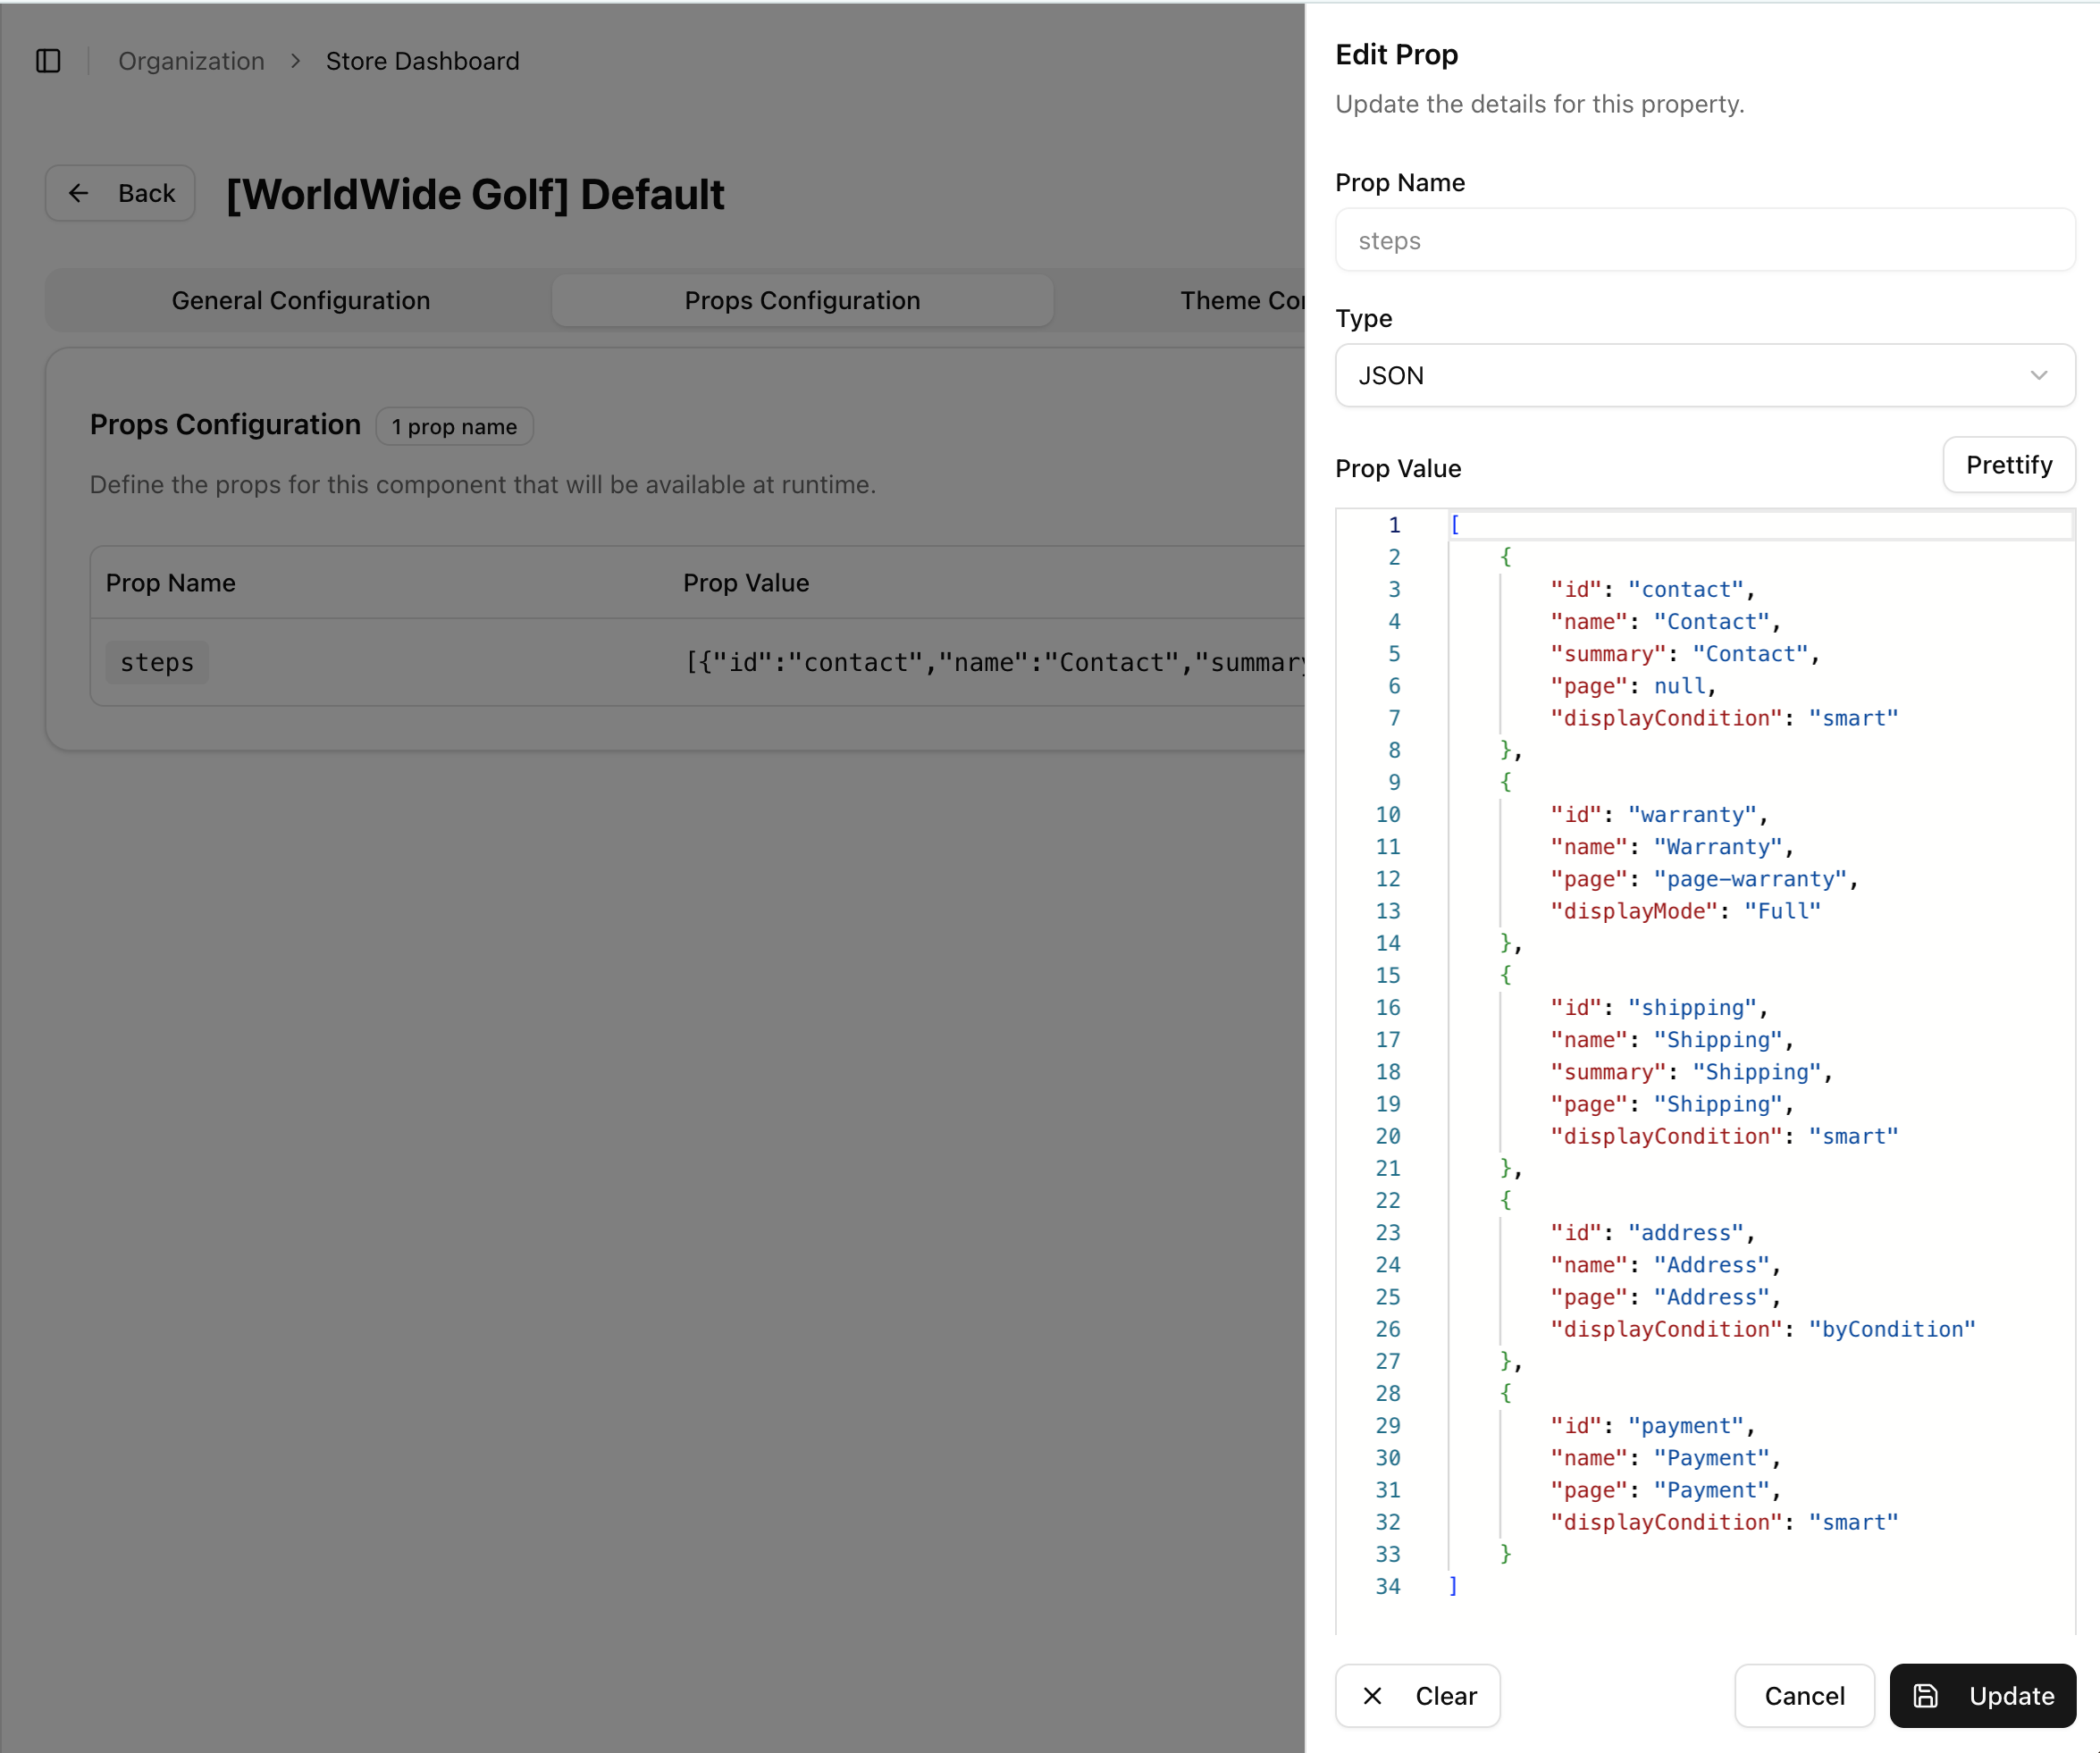
The Ollie Shop Default template has four steps:
ContactShippingAddress (this is a step that only appears for the first time buyer or when an address is incomplete)Payment
Steps
A Step is composed of a few properties
id | string | Id of the step |
|---|
name | string | Name of the step |
page | string | undefined
Note : If it is a default page, you don’t need to specify a page. | The property for setting a component to replace/insert on this page. |
summary | string | undefined
Note : If it is a default page, you don’t need to specify a summary. | The property for setting a component to replace/insert on this summary. |
displayCondition | smart | required | byCondition | smart by default. When it is smart if the step has all the data selected, you will skip this step and be automatically redirected to the next step. If it’s required this step will always be displayed. If it’s byCondition the step will be displayed according to a condition defined in the step page. |
displayMode | Default | Full | Default the new step will include two sections, left side for the custom component and right side for the Cart Summary. Full is for a blank page. |
Default steps setup
"steps":[
   {
        "id": "contact",
        "name": "Contact",
		"page": null,
        "summary": "Contact",
        "displayCondition": "smart"
    },
    {
        "id": "shipping",
        "name": "Shipping",
		"page": "Shipping",
        "summary": "Shipping",
        "displayCondition": "smart"
    },
    {
        "id": "address",
        "name": "Address",
        "page": "Address",
        "displayCondition": "byCondition"
    },
    {
        "id": "payment",
        "name": "Payment",
        "page": "Payment",
        "displayCondition": "smart"
    }
]
Adding a custom step
A Step must always include a page. In a new blank page there are no slots, so a way to think about a page is that it’s where you’ll upload a single component.
A page is a custom component
 In order to include an extra step you’ll need to define all the steps as well as include the new custom step
[
   {
        "id": "contact",
        "name": "Contact",
        "summary": "Contact",
        "page": null,
        "displayCondition": "smart"
    },
    {
        "id": "warranty", // this step is a custom step
        "name": "Warranty",
        "page": "page-warranty",
        "displayMode": "Full"
    },
    {
        "id": "shipping",
        "name": "Shipping",
        "summary": "Shipping",
        "page": "Shipping",
        "displayCondition": "smart"
    },
    {
        "id": "address",
        "name": "Address",
        "page": "Address",
        "displayCondition": "byCondition"
    },
    {
        "id": "payment",
        "name": "Payment",
        "page": "Payment",
        "displayCondition": "smart"
    }
]
You can add a custom page to a native step, simply change the page and we’ll load your page.
Display Condition
    {
        ...
        "displayCondition": "smart" | "required" | "byCondition"
		...
    }
Smart
When you add a new step, this step will be "smart" by default. This means that if all of the required actions in a step have been done, the user will jump to the next step.
Required
To make a step always appear, change the displayCondition of any step to "required"
byCondition
The step will be displayed according to a condition defined in the page.
Display Condition and Custom Pages
When creating a new step, you’ll also have to create a new page. It is likely that your page will contain some fields, and depending if the user has taken a specific action in this page, you’d like the user to always have to go through this page until the action is completed.
To improve the user experience and skip steps that don’t require changes, you need to pass the information to the Ollie cart. To do this, you need to create a function and add a property, as shown in the example below.
extensions: {
    checkoutSteps: {
        warranty: {
            isCompleted: true,
        }
    }
}
In the next example, we validate if we have a product with a “warranty.” If we do, the page will be marked as incomplete so the user can see this page in the checkout flow.
Function example:
export const handler = async ({ res }: { req: Request; res: Response }) => {
  const rawSession = await res.json();
  try {
    // Check if cart contains products requiring warranty step
    // This determines if warranty step should be displayed in checkout flow
    const categoryWarranty = "6";
    const hasProductWithWarranty = rawSession.items.some(item =>
      item.productCategoryIds.includes(`/${categoryWarranty}/`)
    );

    const newSession = {
      ...rawSession,
      extensions: {
        checkoutSteps: {
          warranty: {
            isCompleted: !hasProductWithWarranty,
          }
        }
      },
    };

    return new Response(JSON.stringify(newSession), res);
  } catch (error) {
    // Handle errors gracefully and return original response if processing fails
    console.error('Function execution failed:', error);
    return new Response(JSON.stringify(rawSession), res);
  }
};
Use versions to have different journeys at the same time